Introduction
It’s sandal season, and no one wants callused feet ruining their summer style. Luckily, you can achieve baby-soft feet without endless filing during a pedicure session. In this comprehensive guide, we explore an efficient 8-step process to effortlessly remove calluses, conserve energy, and provide your clients with smooth, beautiful feet.
Important Precautions
Before beginning any treatment, assess the client’s feet for open wounds, infections, extremely dry skin conditions like psoriasis or eczema, or signs of inflammation. In such cases, advise consulting a dermatologist or podiatrist. Always wear disposable gloves and a face mask if needed. Note that one foot often has more calluses than the other. Start with the foot with fewer calluses as the second foot will require a longer soak time.
Items You’ll Need
- PodoSafe Callus Softener
- PodoSafe Cuticle Softener
- Plastic film roll
- Cotton rounds
- Curette with retractor
- Disposable foot files
- Towel or paper towel
- Skin moisturizer
Step 1: Apply PodoSafe
Use cotton rounds to apply PodoSafe directly to dry feet calluses, avoiding direct foot spray to prevent wastage. This method maximizes the product’s effectiveness.
Step 2: Wrap with Plastic
Secure the cotton rounds with plastic wrap to maintain warmth, essential for product activation. Allow an average soak time of seven minutes, adjusting for temperature and callus severity. In cases of accentuated calluses or cold feet, you may use aluminum foil or thermal pads for optimal results.
Step 3: Address Cuticles
Apply PodoSafe in an eyedrop bottle to toes to soften cuticles. No soaking time needed. Use a cuticle pusher while maintaining moisture, applying minimal pressure to avoid damaging nails. Employ a curette to scoop and remove cuticles effectively.
Step 4: Remove Plastic and Scrape
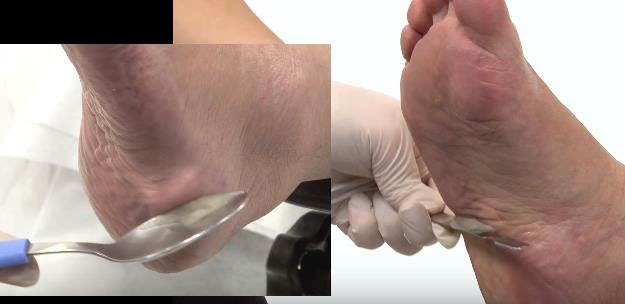
After the soaking period, remove the plastic wrap and scrape off dissolved calluses with a cuticle pusher or the edge of a spoon. Re-soak if necessary for complete removal.
Step 5: Buff Remaining Calluses
Using the disposable foot file, gently buff the remaining calluses post product drying. This step ensures a smooth finish.
Step 6: Clean and Dry Feet
Thoroughly rinse the feet using warm water to remove residual product and exfoliation granules. Dry with disposable towels for hygiene.
Step 7: Sanitize Tools
Dispose of the plastic sleeve housing the file after usage. The sleeve eliminates the need for handle sterilization, ensuring maximum sanitation.
Step 8: Moisturize
Finish by applying your preferred skin moisturizer. This final step leaves the feet soft and nourished.
Additional Tips
If significant calluses remain, consider a second treatment after one week. This interval approach prevents excessive callus regeneration and promotes long-term softness.
Conclusion
With these expert-backed steps, giving your clients impeccably soft, callus-free feet is easier than ever. This efficient process not only enhances foot aesthetics but also optimizes time and effort, making it a must-have technique for summer foot care.


