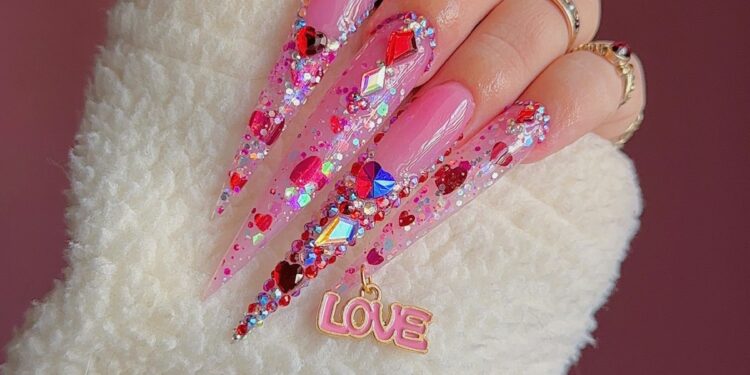
Get Your Nails Stuck In Love This Valentine’s Day
Valentine’s Day is just around the corner, and what better way to celebrate than by adorning your nails with a stunning design? Lindsay Walters, known as Nails_by_Lindsay_, shares an exclusive tutorial for her exquisite ‘Stuck In Love’ nail design. This design combines elegance and creativity, making it perfect for anyone looking to dazzle this season. Follow along to create this breathtaking look!
Products You Need
- Ana Does Nails “Love Bomb” Glitter Acrylic
- Tones Clear Acrylic for encapsulation
- Kiara Sky “Dark Pink” All-in-One Powder for the base color
- Madam Glam No Wipe Top Coat
- Makartt Rhinestone Glue
Step-by-Step Tutorial
Step 1: Prep Your Natural Nails
Before applying anything, ensure your nails are well-prepared. A great prep duo is Babe Nails Nail Prep Dehydrator and Mega Bond. This ensures your acrylics last longer and your nails look flawless.
Step 2: Color and Glitter Application
Here’s how to apply different styles on each nail:
- Thumb Glitter Ombre: Apply dark pink acrylic where the nail tip meets the natural nail. Build the apex and fill the cuticle with dark pink, using less product towards the tip. Add Love Bomb glitter on the clear tip, blending softly.
- Pointer Acrylic French: Begin by placing the first bead at the tip, dragging the acrylic down the center for a deep French look. Shape into a wide U, add Love Bomb glitter on the tip and around the French section.
- Middle Glitter Ombre: Apply dark pink base through the entire nail, keeping it thin from the tip to allow space for glitter. Cover the extended tip with glitter, dragging small glitters past the tip.
- Ring Dark Pink: Fully cover this nail with dark pink acrylic without encapsulation.
- Pinky Glitter Ombre: Repeat the middle finger technique.
Step 3: Encapsulation
Encapsulate the design on thumb, pointer, middle, and pinky nails with clear acrylic. Ensure you create the perfect apex and shape them as needed.
Step 4: File and Shape
File and shape the nails carefully without forgetting to seal the cuticle to prevent lifting.
Step 5: Rhinestone Application
This is where you can get creative! There are two methods:
- Intentional Placement: Dab glue on a palette. Using tweezers, dip rhinestones in glue, place them on the nail, and cure for 30 seconds.
- French Tip Outline: Use the first method for outlining the French tip, cure it, then apply a thin layer of glue over the tip, filling with additional rhinestones. Ensure secure edges and cure.
Step 6: Final Touches
Apply a top coat on all nails around the rhinestones, ensuring not to coat them directly.
Step 7: Optional Charm Addition
If you drilled a hole in the pinky, attach a charm using a loop connector and pliers.
Step 8: Flaunt Your Nails
Apply cuticle oil to nourish and give a finished look to your nails. Now you are ready to dazzle the world!
Lindsay Walters is a renowned nail influencer based in Atlanta, Georgia. Starting her nail career at 18, she’s passionate about helping people express their inner beauty through nail art. For more inspiration, follow her on social media for stunning designs.


