Introduction to Red Shellac Nail Art
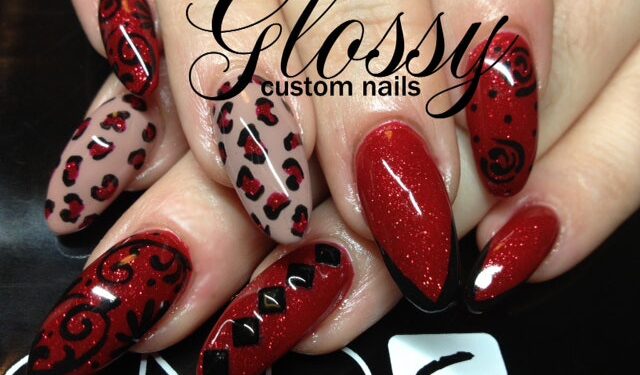
The art of manicure has evolved into a sophisticated form of self-expression, incorporating intricate designs and techniques. In this tutorial, you will learn how to create an elegant red shellac manicure featuring opulent leopard patterns, swirls, and studs, guided by Sharleen of Glossy Custom Nails.
Materials Needed
To recreate this striking look, gather the following materials:
- CND Shellac in Red
- Acrylic Paint (Black)
- Nail Glue
- Studs and Bling Accessories
- UV/LED Lamp
- Nail Brush
- CND Shellac Top Coat
Step-by-Step Nail Art Tutorial
Step 1: Apply the Base Coat
Begin by using CND Shellac to coat your nails in your desired shade of red. Ensure even application and cure the gel polish under a UV or LED lamp. This forms a vibrant base for your nail art.
Step 2: Create Your Design
With a fine-tip nail brush, paint your chosen design on the nails using black acrylic paint. Whether you choose leopard spots, opulent swirls, or both, allow the design to dry completely before proceeding.
Step 3: Add the Bling
Carefully apply a small amount of glue onto the nail where you want to add studs or bling. Place the accessories gently and allow them to set. This adds dimension and sparkle to your manicure.
Step 4: Feature Nail Enhancements
Add misshapen shellac spots on the feature nail, then cure them under the lamp. Semi-outline these spots with black acrylic paint to accentuate the design. This step creates a captivating focal point on the feature nail.
Step 5: Seal With Top Coat
To ensure longevity and shine, finish by sealing your nail art with a CND Shellac top coat. Cure the top coat to secure all elements in place and reveal a polished, stunning finish.
Conclusion
Creating an elegant red shellac manicure is an art form that allows you to express creativity and care in every detail. By following these steps, you can achieve a design that is not only eye-catching but also durable and wearable for any occasion. For more inspirations and designs, visit Glossy Custom Nails online or follow them on social media platforms.
Explore more at Glossy Custom Nails or connect on Twitter at @Glossynails, Instagram at @Glossynails, and Facebook at Glossycustomnails.


