Embrace the Elegance of Marble Mani
The marble mani remains one of the most timeless and chic nail art trends. This versatile technique allows you to create visually stunning designs that mimic the natural beauty of marble stone. With a few simple products, anyone can achieve these artistic effects. Today, we will explore three innovative ways to use the marbleizing technique that will invigorate your nail art offerings.
Look One: The Classic Marble Mani
The Classic Marble Mani is a sophisticated and elegant design that emphasizes soft colors and graceful lines. Here’s how you can achieve it:
Step 1: Begin by prepping your nails. Apply two coats of an off-white gel polish, ensuring you cure each layer properly. This neutral base sets the stage for your marble design.
Step 2: Once the base is set, remove the tacky layer. Dot pink and purple watercolor polish or gel in a ‘Y’ shape on each nail. If using a watercolor gel, this step follows the gel’s application instructions.
Step 3: Using a flat gel brush lightly dipped in acetone or alcohol, manipulate the dots to spread and create delicate, imperfect lines that form a classic marble look.
Step 4: For a touch of glamour, paint a thin line at the cuticle with gold glitter gel polish. Finish with a gel top coat and cure.
Look Two: Blooming Blossoms
Bring a garden to your fingertips with the Blooming Blossoms marble manicure. This design captures a vibrant floral essence:
Step 1: Start with two coats of nude gel polish on prepped nails, curing each layer. This subtle backdrop highlights your floral design.
Step 2: Remove the tacky layer. At the nail’s free edge, create petals using dark red watercolor polish or gel. Use a lighter red inside the petals to create depth and dimension, curing as necessary.
Step 3: Outline the petals with black gel paint to accentuate their shape and add small dots at the flower’s center. Cure this layer.
Step 4: Add green leaves using a similar technique, outline with black gel for detail. Seal everything with a gel top coat and cure for durability.
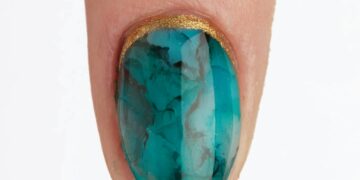
Look Three: True Turquoise
The True Turquoise look brings an oceanic vibe with its swirling blue and green hues. Here’s how to craft this striking design:
Step 1: After prepping, apply a sheer turquoise gel polish to each nail. Cure this base layer to perfection.
Step 2: Once the base layer is ready, remove the tacky finish. Drop green and blue watercolor or gel polish onto the nail surface. Follow manufacturer guidelines when working with specific gels.
Step 3: Carefully paint black veins with gel paint across the nail. Without curing, use a dry brush to blur these lines for a more natural marble appearance.
Step 4: Add a touch of sophistication by painting a thin gold glitter gel line along the cuticle. Finish with a gel top coat and cure.
Whether you’re a nail professional or an at-home enthusiast, these three variations offer a fresh take on the classic marble technique. Explore each look, experiment with colors and styles, and let your creativity shine.


